 |
| Big views on the BBT. |
The Santa Monica Backbone Trail ~ 2017
The Santa Monica Backbone Trail follows the crest of the Santa Monica Mountains for 68 miles from Point Mugu to Will Rogers State Park. The BBT (Backbone Trail) climbs 19,000 feet (and descends 18,500 feet) over a collection of dirt trails, gravel roads and even some rock scrambling.
During the spring of 2017 my hiking compadre Hobbes and I set out to thru-hike the entire route in under 3 days. The heat on the steep climbs was grueling, sometimes well into the 90's, with no natural water sources, exposed trails and little shade. . . but the miles of wildflowers and epic views made every step worth while.
Let the adventure begin.
~ Aerial Overview of the BBT ~
 |
| Aerial overview of the Santa Monica Backbone Trail |
 |
| Day One: 22 miles and a 6,600' climb. |
DAY ONE: 22 miles.
Thru-hiking the BBT requires parking a car at the end and taking a shuttle to the beginning. After parking at Will Rogers State Park we caught an Uber to the start at Point Mugu. The Ray Miller trailhead at Point Mugu is the unofficial beginning and by the time we finished with the shuttle logistics it was already 10:00 am.
The plan was to hike 22 miles with over 6,600' of elevation gain the first day. For perspective consider that climbing the tallest mountain in the contiguous US (Mt. Whitney, 14,500') requires only 6,000' of elevation gain over the same 22 mile distance. Most people take a few days to climb Mt. Whitney and usually setup a base camp along the way. . . but if we wanted to finish the entire BBT in three days we would need to average at least 22 miles each day.
 |
| The unofficial start of the BBT at the Ray Miller trailhead. |
 |
| Miles of wildflowers on the BBT. |
 |
| Spring flowers and coastline views. |
 |
| Hobbes. |
 |
| Ocean views and green canyons on the climb to Sandstone Peak. |
 |
| The steep, hot and exposed climb to Sandstone Peak. |
 |
| Lush canyons in Spring. |
 |
| Sandstone Peak (aka Mt. Allen) the high point of the BBT at 3,111 feet. |
 |
| Sandstone Peak @ 3,111 feet. |
 |
| Day 2: 27 miles, 7,300' up and 6,900' down! Ouch. |
DAY 2: 27 miles.
Day 2 started with an easy stroll into a lush shady canyon along well engineered switchbacks. . . but that would change by the end of the day. The goal for today was to make Saddle Peak, about 27 miles to the east.
Once we reached the rock scrambling section along the Castro Crest Hobbes started to fade. He had just finished a medical procedure two days prior and asked the doctor, "so can I run a marathon in two days?". The doctor warned against doing too much strenuous activity so soon and by mid-day his advice started to ring true. The extreme heat, big miles and steep climbs finally lead to severe dehydration and it was not safe for Hobbes to continue. At Malibu Canyon he called for an Uber and in a few hours he was having dinner in the comfort of home.
I decided to continue solo and after a water break and thru-hiker style "shower" at the Piuma Trailhead bathroom I headed toward the final 1,500 foot climb to Saddle Peak. During the extreme heat it really helped to rinse out my shirt to help cool down before moving on. There's nothing like wearing a well rinsed wet shirt while hiking on a hot day.
It was dark by the time I reached Saddle Peak at 8:00 pm. It had been a long 13 hour day but worth every mile to see the panoramic views of the entire L.A. basin, ocean, coastline and beyond from the summit!
 |
| Cool shady canyon hike in the morning. |
 |
| Day 2 destination in the distance: Saddle Peak. |
 |
| Scrambling route along the Castro Crest |
 |
| Rocky "trail" along the Castro Crest |
 |
| View from the Castro Crest |
 |
| Castro Crest |
 |
| Castro Crest |
 |
| Castro Crest |
 |
| The view looking North toward Calabasas |
 |
| Taking a break at the Piuma Trailhead before the climb to Saddle Peak. |
 |
| Short road-walk on Piuma Road. |
 |
| Easy to miss Backbone Trail sign on Piuma Road. |
 |
| City Lights and beyond from Saddle Peak. |
 |
| Day 3: 18 miles, 4,700' up and 7,100' down. |
DAY 3: 18 miles:
Day 3 was going to be a breeze compared to the big miles on Day 2, and I was already looking forward to a cheese burger at the end. The last section starts with an easy hike down into Hondo Canyon but quickly picks up elevation after crossing Topanga Canyon and climbing up to Trippet Ranch. There were many more busy road crossing on this last section and some of the trail signs were easy to miss, but once I reached Musch Camp it was all downhill to Will Rogers State Park. The big panoramic views of the entire LA Basin were beautiful and it was clear all the way to the Pacific Palisades, Catalina and beyond.
A few of the advantages to this busier last section were the more frequent water sources and places to camp. Check out the Water Sources and Camp Site sections at the end of the story. . .
 |
| Morning view from Saddle Peak. |
 |
| Fields of wildflowers in Hondo Canyon. |
 |
| Big Water Tank along the BBT (trail to the right). |
 |
| The BBT crosses Topanga Canyon Blvd. at Greenleaf Canyon Road (trail entry visible on opposite side of the Blvd.). |
 |
| A welcome water source and bathroom can be found at the Dead Horse Trailhead parking lot (near Topanga Canyon Blvd.). |
 |
| Approaching Trippet Ranch. |
 |
| Water fountain right on the trail near Trippet Ranch. |
 |
| Musch Camp. |
 |
| Eagle Rock. |
 |
| Getting close to civilization, first views of LA from the BBT. |
 |
| Panoramic views of LA and beyond from the BBT. |
|
| Santa Monica and Pacific Palisades from the BBT. |
 |
| Rocky trail approaching the bridge section on the BBT. |
 |
| Coastline views from the BBT. |
 |
| Horses at Will Rogers State Park. |
 |
| Will Rogers State Park. |
 |
| Trail entry at Will Rogers State Park. |
Thru-hiking the BBT was a fun way to get a wilderness experience while staying relatively close to home. The trailhead is only an hour away and just the cruise along PCH is worth the drive. Since I first thru-hiked the trail in 2017 I have gone back and revisited a few of my favorite sections in 2018. I plan on thru-hiking the entire trail in two days later in 2018 as a way to train for some longer trips in the Sierra this summer.
Thanks for reading.
Water Sources on the BBT:
Water is scarce on the BBT and it was important to plan ahead. I left several water caches at easily accesable road crossings and trailheads. Water sources are much less frequent on the west half of the trail. Here is a list of the available water sources along the trail:
Danielson Ranch: Mile 8 (water fountain at rock circle).
Malibu Conservation Camp: Mile 26 (fire station at the end of Rattle Snake Road).
Malibu Canyon: Mile 45 (inside the bathroom at the Piuma Trailhead).
Dead Horse Trailhead: Mile 58 (water fountain and bathrooms, near Topanga Canyon Blvd. and Greenleaf Canyon Road)
Trippet Ranch: Mile 59 (water fountain right on the trail, bathrooms and water at the trailhead parking lot)
Musch Camp: Mile 60 (water fountain right on the trail, bathrooms at the camp).
Camping on the BBT:
According to the NPS website, "Camp sites are extremely limited along the Backbone Trail". There are only a few designated camp sites nearby the trail. The three that I am aware of include:
Circle X Ranch: Mile 18: Located within about 1 mile from the trail at 12896 Yerba Buena Rd, Malibu, CA 90265. More info here: Circle X Ranch.
Malibu Creek State Park: Mile 45: Located a few miles from the trail at 1925 Las Virgenes Rd, Calabasas, CA 91302. More info here: Malibu Creek State Park
Musch Hike In Camp: Mile 58: Located about 1 mile from Trippet Ranch right on the BBT. More info here: Musch Hike In Camp.
The approximate mileages above include the mile(s) from the BBT to the camp site.
It is not legal to camp outside of designated camp sites. Glen Van Peski has written some good articles about being mindful of the Seven Leave No Trace Principles while responsibly 'stealth camping'. His excellent website is here: Gossamer Gear Blog.
GPS Waypoints and Mileage/Altitude Breakdown:
The following GPS waypoints are from the NPS Backbone Trail website (
NPS Backbone website). According the NPS website there is a total of 19,000 feet of ascent and 18,500 feet of descent when going eastbound on the BBT. My measurements confirm these numbers, although the total altitude change is slightly different on the chart below.
 |
| Mileage and Altitude Breakdown. |
Ultralight Gear on the BBT:
To comfortably hike long days with big miles and steep climbs it was helpful to go as light as possible for the BBT. Hobbes and I both used lightweight minimalist gear including homemade backpacks and quilts, lightweight foam sleeping pads and a no-cook menu.
 |
| Take Less Do More with a 4 lb pack. |
I used one of my homemade cuben fiber backpacks.
 |
| Custom (homemade) cuben fiber ultralight backpack. |
. . . and stayed warm at night while sleeping under a homemade Lightweight Summer Quilt.
 |
| Custom (homemade) lightweight summer quilt. |
To protect from the wind and bugs I used a homemade bivy.
 |
| Custom (homemade) Ultralight Bivy. |
A Gossamer Gear Nightlight Sleeping Pad is a UL classic. It serves triple duty as a sleeping pad, backpack 'frame' and sit pad for breaks.
 |
| Gossamer Gear Nightlight Pad. |
And of course Gossamer Gear LT4 Carbon Fiber Trekking Poles make the miles easier.
 |
| Gossamer Gear LT4 trekiing poles. |
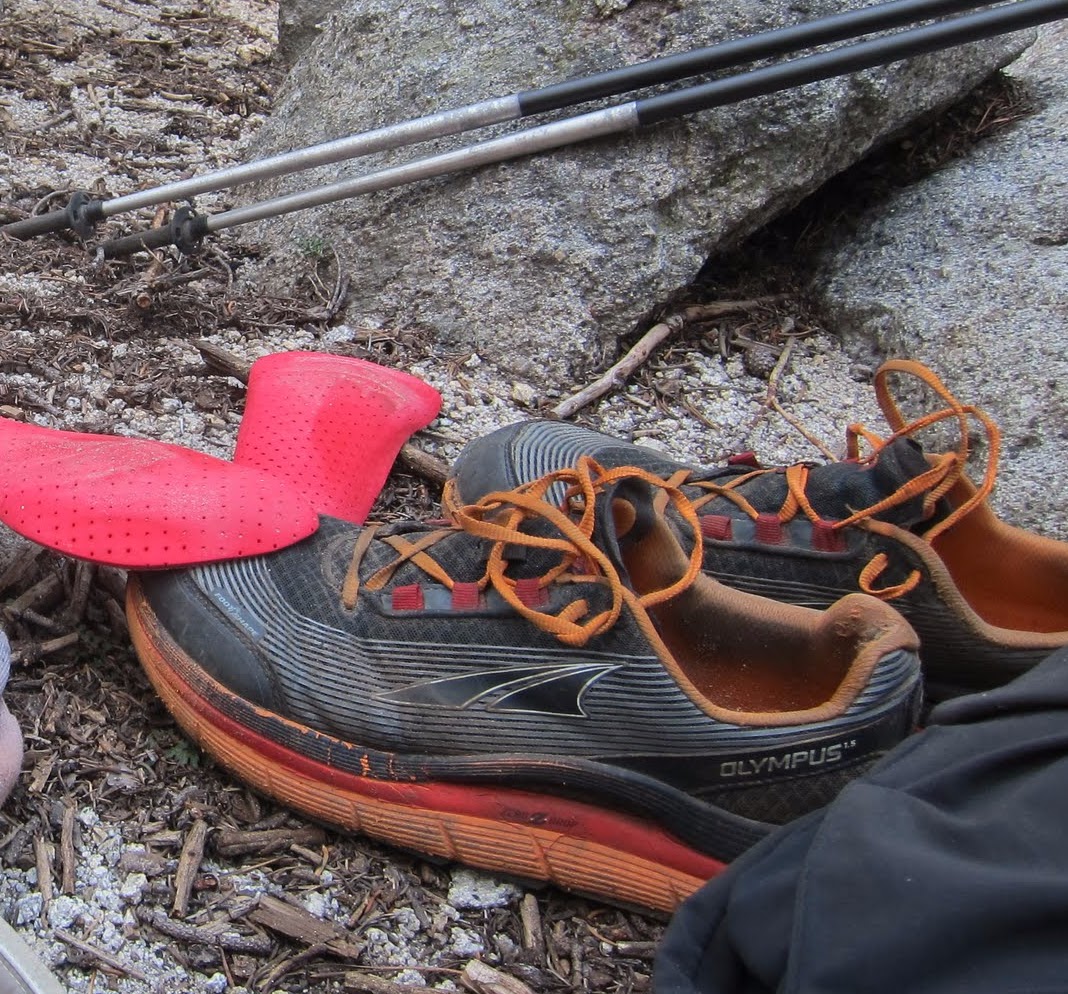
Altra Olympus trail runners have been my hiking shoe of choice for years. I can hike 30 mile days in total comfort and no blisters thanks to Altra.
 |
| A well used pair of Altra Olympus 1.5 trail runners, perfect for my wide feet. |
In the summer I pair my homemade quilt with a Montbell EX Light Anorak for temps around 40 degrees or higher.
 |
| Montbell EX Light Anorak, 9 ozs of UL luxury. |
Check out the BBT Gear List below for more details:


No comments:
Post a Comment